


You might think your Facebook account goes dormant after deactivation. The reality is different. Facebook actively collects and adds new data to deactivated accounts, tracking your interests and purchases.
Deactivating your Facebook account hides your profile from other users. The platform continues to monitor your activities. Most people don’t know the crucial difference between deactivation and deletion. Your data stays intact with deactivation, but deletion removes it permanently – a process that needs up to 90 days.
Your online privacy matters to us. This piece shows you the right way to deactivate your Facebook account. You’ll learn about both deactivation and deletion methods, understand what happens to your data, and choose the best option for your Facebook presence.
Let’s take a closer look at securing your privacy on Facebook!
Understanding Facebook’s Data Collection Practices
Facebook collects way more data than most users think. You should understand what information the platform collects and how they use it before you decide how to deactivate Facebook account. This knowledge will help you make better choices about your digital privacy.
What data Facebook collects from users
Facebook gathers a huge amount of personal information through many different ways. Your digital profile grows with each interaction on the platform. Facebook collects these types of data:
- Profile information: Everything you voluntarily provide – your name, age, relationship status, religious beliefs, political views, and even sensitive health information
- Content and communications: All posts, photos, videos, comments, messages, and metadata associated with this content (like location tags in photos)
- Behavioral data: Your interactions, likes, shares, comments, dwell time, and whether you watched videos with sound on or off
- Device information: Hardware models, operating systems, battery levels, signal strength, available storage, browser type, app and file names, and plugins
- Location data: GPS data, device signals, Wi-Fi access points, Bluetooth signals, and nearby devices
- Transaction information: Purchase history, credit card information, and billing details
- Network connections: Your friends, groups joined, and pages followed
Facebook can predict highly personal traits by analyzing this data. Research shows that Facebook “likes” alone can reveal your race, religion, and sexual orientation.
How Facebook tracks you even when logged out
Facebook keeps watching your online activities even after you log out. The company tracks users across the internet with advanced technology.
Facebook receives data about your activities on websites with Facebook integration. This happens whether you’re logged in or even have an account. The tracking happens through:
Social Plugins: The “Like” and “Share” buttons you see on millions of websites send data back to Facebook whenever you visit a page that has them – even if you don’t click. Facebook’s servers get information about your browsing habits just by loading these pages.
Facebook Pixel: This tiny, invisible image file sits on countless websites and watches what you do online. Website owners use this code to measure their ads’ success. Facebook can then record products you look at, items in your cart, and things you buy.
Facebook Login: The platform learns about your activity on other services when you use Facebook credentials to sign in.
Facebook can connect your online activity to your IP address and build a detailed profile of websites you visit, even when you’re not logged in.
The difference between visible and invisible data
Facebook collects two types of data: information users knowingly share and hidden data gathered without their awareness.
Visible data is what you deliberately put on your profile – photos, status updates, personal details, and friend connections. You can control who sees this information through privacy settings. These settings let you restrict visibility to friends, specific groups, or make content public.
Invisible data is a wealth of information Facebook quietly collects. This includes:
- Time spent hovering over posts
- Websites visited outside Facebook
- Physical location patterns
- Device identifiers and technical specs
- Interests and priorities based on browsing history
Researchers identify “quasi-visible data” between these categories – information that users can’t see right away but can access through specific tools. This might be archived stories, analytics data, or information you can only get by requesting your data download.
This difference matters because privacy controls mostly work for visible data. They don’t protect you much from Facebook’s hidden data collection. Facebook shares this invisible data with advertisers and partners, creating a big network of personal information exchange.
The hidden data collection system stays active on websites you visit even if you later deactivate or delete your Facebook account.
Deactivation vs. Deletion: What’s the Difference?

Facebook users often get confused about two ways to step back from the platform. You need to understand the significant differences between deactivation and deletion to decide how to deactivate Facebook account.
Temporary deactivation explained
Temporary deactivation acts like a pause button on your Facebook presence. Your profile becomes invisible to other users while Facebook keeps all your data intact. You can return anytime without losing your content or connections.
Your account changes after deactivation:
- Your profile disappears and becomes unsearchable
- Others can still see some information like messages you’ve sent
- Your friends might see your name in their friends list (visible only to them)
- Group admins can still see your posts, comments, and name
- Your Facebook profile picture stays visible in Messenger conversations
- People can search for you to send messages
- You keep access to Facebook Messenger
- You can’t use Facebook Login for Meta Quest products
Facebook handles deactivated accounts just like active ones. Their data policy applies and they can collect and add new information to your profile. The platform has no time limit on storing data from a deactivated account – they might keep it forever unless you delete it.
Permanent deletion process
Deletion completely removes your Facebook presence. The process starts with a mandatory waiting period.
Facebook waits 30 days after your deletion request. Your account stays deactivated but not deleted during this time. This grace period serves a purpose – logging back into your account within these 30 days cancels the deletion request automatically.
The platform takes up to 90 days to delete everything you’ve posted after the 30-day period ends. A 2023 study revealed that Meta (including Facebook) keeps users’ data for 180 days after account deletion.
What happens to your data in each case
Your personal information faces two very different fates with these options.
With deactivation:
- Facebook’s servers keep all your data
- Your profile, photos, posts, and connections remain intact
- Facebook adds new data to your account
- Third-party logins work (Spotify, Pinterest, etc.)
- You can reactivate by simply logging back in
With deletion:
- Facebook permanently removes your profile, photos, posts and videos
- You lose Facebook Messenger access
- Third-party apps using Facebook login stop working (like Spotify or Pinterest)
- Others can still see some information like messages you sent
- Facebook’s database keeps copies of certain material but “disassociates them from personal identifiers”
- Log records stay stored without your name
Some digital footprints remain even after deletion. Your friends can still read messages you sent. Posts your friends made about you stay online. Facebook likely collects information about you through their tracking tools on websites, even with a deleted account.
Deactivation works best for temporary breaks while keeping your data safe. Deletion offers a more permanent way to leave the platform, though some traces of your activity will remain.
How to Deactivate Your Facebook Account on Desktop
Want to step away from Facebook without losing your stuff? Let me show you how to deactivate your account from your desktop. The browser method gives you the clearest view of all your options.
Step-by-step browser instructions
Facebook doesn’t make it easy to find the deactivation page. You’ll need to go through several menus to get there:
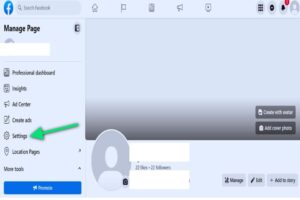
- Click your profile picture in the top right corner of Facebook
- Select Settings & Privacy, then click Settings
- Look for Accounts Center on the left side of your screen
- If you see it at the top left, use the Accounts Center method
- If it’s at the bottom left, go with the Facebook Settings method
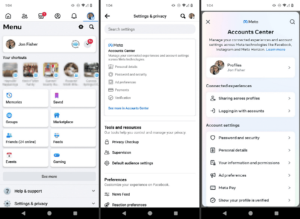
Via Accounts Center (most common in 2025):
- Click Accounts Center in the left menu
- Select Personal details under Account Settings
- Click Account ownership and control
- Select Deactivation or deletion
- Choose your Facebook account if you have multiple Meta accounts
- Select Deactivate account (not Delete account)
- Click Continue
- Enter your password to confirm identity
- Select a reason for deactivation
- Choose whether to automatically reactivate (1-7 days) or stay deactivated indefinitely
Via Facebook Settings (alternative method):
- Click Your Facebook Information in the left menu
- Newer accounts need to click Privacy first, then Your Facebook Information
2. Select Deactivation and deletion
3. Choose Deactivate account then Continue
4.Enter your password and follow the prompts
After completing either process, click the blue Deactivate my account or Deactivate button at the bottom, then confirm one last time.
Managing your data before deactivation
Here are some important steps to take before you deactivate:
- Log out of active sessions: Make sure you’re logged out everywhere by going to Settings > Security and Login > Where You’re Logged In > Log Out Of All Sessions
- Download your data: Your information stays safe during deactivation, but having a backup is smart
- Check connected apps: Services using Facebook Login might not work the same way
- Note your login credentials: Save your email/phone and password for when you return
Your Messenger account stays active even after deactivating Facebook. You’ll need to deactivate it separately if you want both offline.
Confirming deactivation status
A successful deactivation shows up as a “Session Expired” message that asks you to log in again.
You can double-check if your account is truly deactivated:
- Ask a friend to search for your profile or check your timeline
- Use another account to look for your deactivated profile
- Check your Facebook status on connected apps or websites
A deactivated profile becomes invisible to others, but some traces remain:
- Friends can still see your previous messages in their inbox
- Your name might show up in your friends’ friend lists (only they can see it)
- Group admins can still view your old posts and comments
- Your profile picture stays visible in past Messenger chats
Getting back on Facebook is simple – just log in with your email/phone and password. Everything will be right where you left it, including your friends, photos, and posts.
Note that deactivation is temporary – Facebook keeps all your data until you decide to delete your account permanently.
How to Deactivate Facebook Account on Mobile Devices
A social media break starts with deactivating your Facebook account right from your smartphone. Let me show you how to do this on both iOS and Android devices. This way you can step away from social media wherever you are.
iPhone and iPad instructions
The Facebook app’s menu system has a specific path to deactivate your account:
- Open the Facebook app on your iPhone or iPad
- Tap the Menu icon (three horizontal lines) in the bottom-right corner
- Scroll down and select Settings & Privacy, then tap Settings
- Tap See more in Accounts Center
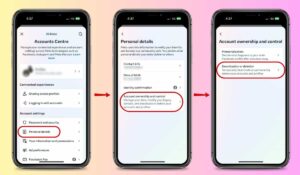
- Select Personal details, then tap Account ownership and control
- Choose Deactivation or deletion
- Select your account from the list if you have multiple Meta accounts
- Tap Deactivate account (not Delete account)
- Tap Continue when prompted
- Follow the on-screen instructions to confirm deactivation
Facebook will ask for your password and why you’re leaving. They might suggest ways to improve your experience, but the choice to deactivate is yours.
Android deactivation process
Android users can follow these slightly different steps:
- Open the Facebook app on your Android device
- Tap the Menu icon (three horizontal lines) in the top-right corner
- Scroll down and select Settings & Privacy, then tap Settings
- Tap Accounts Center
- Select Personal details, then tap Account ownership and control
- Choose Deactivation or deletion
- Select your account from the list
- Tap Deactivate account (not Delete account)
- Tap Continue
- Complete the final confirmation steps as prompted
Your account becomes invisible to other users right after confirmation. The app logs you out automatically.
Troubleshooting common mobile deactivation issues
You might run into some snags while trying to deactivate through the mobile app. Here’s how to fix the most common issues:
Session expired errors: These pop up during the final confirmation. Try these fixes:
- Clear the app’s cache through your device settings
- Log out and back in before trying again
- Update your Facebook app
- Switch to a different internet connection
Cannot find deactivation option: If the deactivation settings seem hidden:
- Update to the latest app version
- Use your mobile browser in desktop mode
- Look up “deactivation” in Facebook’s help section
Pending activities preventing deactivation: Facebook needs you to handle some tasks first:
- Handle any pending friend requests
- Finish or cancel unfinished posts
- Take care of group activities that need attention
Your profile disappears from view after mobile deactivation. Your messages stay visible to recipients, and group admins can still see your previous activity.
Want to come back? Just log in through the app or any browser. Your profile reactivates with all your content and connections intact.
What Happens After You Deactivate Facebook
Your Facebook account deactivation triggers several behind-the-scenes changes that you might not notice right away. You should know these changes to protect your online privacy better after you’ve learned how to deactivate Facebook account.
Profile visibility changes
Your profile becomes invisible to other Facebook users once you deactivate. Nobody can search for you or see your timeline anymore. All the same, your digital footprint doesn’t completely disappear. Your friends might still spot your name in their friends list, but only they can see it. Group admins can still view your previous posts and comments with your name. Your profile picture changes to a default gray silhouette in message threads.
Deactivation keeps all your content, unlike deletion. Old conversations stay available to recipients, but they can’t start new interactions with you. Your name shows up as plain text because Facebook removes the link to your account.
Impact on Messenger and connected apps
Deactivating Facebook doesn’t shut down Messenger automatically. You can still use Messenger even with a deactivated account. Keeping Messenger active means your profile picture stays visible in chats and people can search your name to message you. But if you deactivate Messenger too, friends won’t be able to reach you through the app.
Third-party apps usually let you keep using Facebook Login for services like Spotify, Pinterest, or games. Turning off Facebook’s app integration permanently cuts these connections. Note that Meta Quest products become inaccessible after deactivation.
How Facebook continues tracking deactivated accounts
Facebook keeps collecting your data even after deactivation, which might worry some users. The platform treats deactivated accounts just like active ones and tracks your online activities. On top of that, advertisers’ new data gets added to deactivated accounts, building your digital profile continuously.
The reason is simple – Facebook expects you’ll come back. They keep building profiles to show relevant ads when you return. From Facebook’s view, deactivation just means you don’t want to use social media while keeps going.data collection
Of course, permanent deletion stops this tracking completely. Facebook has no rules about how long it keeps data from deactivated accounts – they might store it forever.
How to Delete Facebook Account Permanently
Permanent deletion provides the most definitive way to cut ties with Facebook by removing your digital presence completely. You should understand what happens with your account at the time you decide to delete it permanently. Let’s explore how to deactivate Facebook account permanently.
Data backup procedures
Your Facebook information needs a backup before deletion. Here’s how to download your data:
- Click your profile picture in the top right corner
- Select Settings & Privacy, then Settings
- Click Your Facebook Information or direct to Accounts Center > Your information and permissions
- Select Download Your Information
- Choose what data to include (posts, photos, messages, etc.)
- Select date range (All time recommended)
- Set media quality to High for best photo resolution
- Choose format (HTML for easy navigation, JSON for developers)
- Click Create files
Facebook sends a notification once your download is ready. The process takes several hours or days based on your data volume. Remember to download your files within 4 days as the link expires after that.
Step-by-step deletion instructions
After backing up your data, here’s how to delete your account permanently:
- Click your profile picture
- Select Settings & Privacy > Settings
- If Accounts Center appears at the top left, click it > Personal details > Account ownership and control > Deactivation or deletion
- If Accounts Center appears at bottom left, click Your Facebook Information > Deactivation and Deletion
- Choose Delete Account (not Deactivate)
- Click Continue to account deletion
- Enter your password when prompted
- Click Delete Account to confirm
The 30-day grace period explained
Facebook keeps your account on hold for 30 days after requesting deletion. This waiting period increased from 14 days in 2018 because many users wanted to recover their accounts. Your account stays deactivated during this time, and any login attempt cancels the deletion request automatically.
The platform starts removing your data after these 30 days pass. The complete removal process takes up to 90 days. Facebook maintains some information in backup storage to meet legal requirements and handle disaster recovery.
Conclusion
Facebook’s data collection practices go way beyond what most users realize. This makes account management decisions vital to protect privacy. Users now have clear options to control their digital presence instead of letting Facebook track their online activities.
Deactivation works as a temporary break that preserves your data and connections. Facebook still collects information about deactivated accounts with no end date. Permanent deletion is the only definitive way to stop Facebook’s data collection, though this takes up to 90 days.
Your privacy needs will determine whether you should deactivate or delete your account. The best approach is to download your Facebook data and check connected apps that might change. It’s important to note that any login during the 30-day grace period automatically cancels your deletion request.
A clear understanding of Facebook’s information handling gives you the ability to make smart choices about your online privacy. You now have the knowledge to manage your Facebook presence effectively, whether you pick temporary deactivation or permanent deletion.